The Hp Z3200
carriage beltreplacement can
take from 4 hrs. to several days depending how well organized you
are. Carriage belt replacements are common with z series
printers, z3100 and z3200 models. Step by step notes help to
organize the belt replacement, notes by Mark Lindquist on replacing
the z3200 carriage belt for DIY belt replacement. Find the right
tools, materials and replacement carriage belt parts.
Repairing HP
DesignJet , Z3100, Z3200ps, Z Series Printers
Repairing Z3200 Printers - Notes on Tools, Materials, and
Procedures
Mark Lindquist 12/10/2014 - updated --1-03-2017
PART 1 of 2
THE HP Z3200 DREADED SHREDDED BELT
ISSUE (replacing the Z3200 carriage belt)
It's kind of a mystery, when the Z Series printer belts will start
shredding, actually. I think it has to do with usage, but I surmise
infrequent usage can contribute, as the belt would just be sitting in
one position under tension, creating stress at the cog driver and the
tensioner pulley points. But humidity and temp play a factor as well.
That rubber in those cheap belts has a mind of its own and will go soft
when it will. The LPS belts sold online are apparently tougher and last
longer.
Some report belt changes are needed after 3 years, some after 5, but it
varies from printer to printer.
I begin working on my Z 3100 inch plain-vanilla printer when the belt
finally broke. Shredded belts or the "dreaded shredded belt" issue, as I
call it, is The Achilles' heel of all of the Z 3100 (all Z-series)
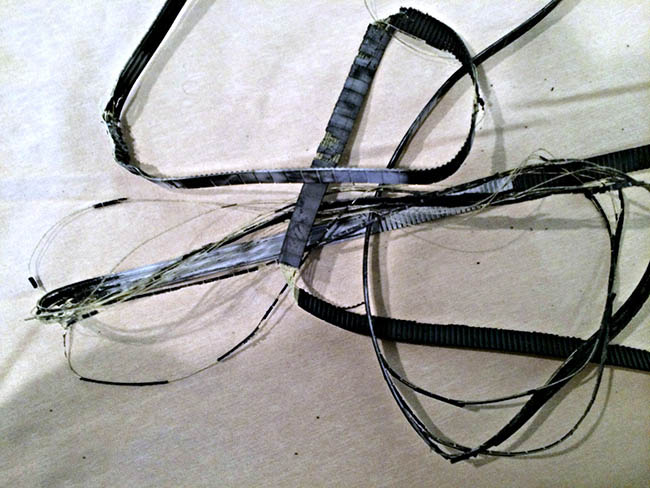
printers. I recently replaced the shredded belt on a Z3200 24” printer
that was given to me. Within hours of running it, the belt shredded
(photo above).
The belts are small and they are in my opinion inadequate for the design
of this printer. Essentially the belt is a modified Gilmer belt. The
belt is driven by a stepper motor that moves the printer head via a
carriage rail. Unfortunately since the belt is fastened (actually quite
easily to the bottom underside) of the printhead carriage the entire
printer has to be torn down to the frame in order to access the bottom
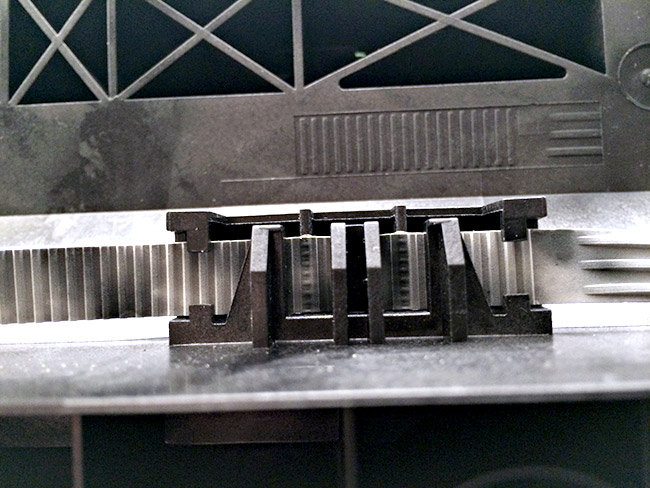
of the print head carriage: (photo below shows the fastening system on
the underside of the print head carriage.)
Underside of print head carriage depicting the belt
fastening mechanism on a Z3200 printer.
Positioning of the belt must be exactly as shown.
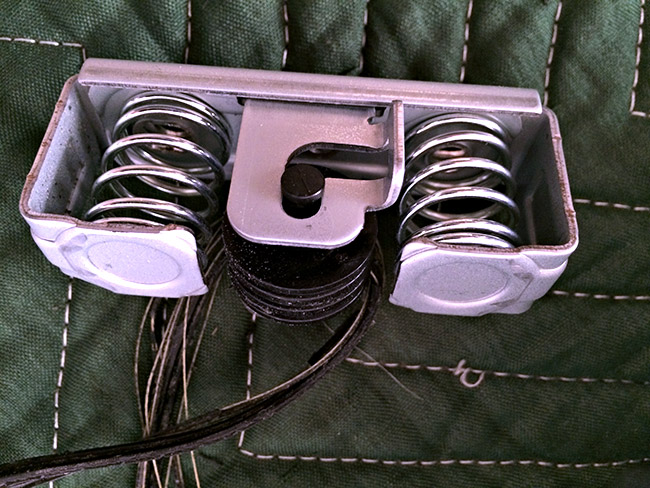
Parts easily snap out of the printer, such as the belt tensioning pulley
assembly: (Note: when you take the belt tensioning pulley system out,
take both springs out and disassemble the tensioning device. Very
simple, and it saves cutting your new belt when putting it back
together.
In other words, don’t try to feed the belt into the pulley without
pulling the device apart completely, first.)
Doing a belt replacement on any of the Z Series printers is actually a
big job and should not be undertaken lightly or by the faint of heart.
Thankfully, Bryan Glynn (BGPictures, Tampa, FL) has made a video that
details specifically how to disassemble the printer incrementally in
order to get to the belt and several other places that may need a little
work.
(Bryan has sold his Z3100 printer, and is no longer supporting it, so
best not to bug him - just send money, LOL)
I watched Bryan's video at least 4-5 times. He
has a ton of good ideas, and suggestions. Watch his video several
times.
Here are Time codes notes that will help in reassembling the printer -
thanks Nackjick:
1) Remove front cover panel (4.74-5.60)
2) Remove left side inspection window cover (9.40-9.60)
3) Remove media lever (10.15-10.54)
4) Remove and bag the inks (10.54-11.00)
5) Remove Network USB port cover (11.00-11.55)
6) Take off the end cover - various screws (11.55-13.04)
7) Remove cutter assembly (13.48-14.06)
So equipped with your manual, your camera, and the wonderful video that
was made to help you, just begin one step at a time, remembering that
each step will carry you that much closer to your goal. Don't think of
just accomplishing the task of replacing the belt however. Think along
the lines of refurbishing your printer, and doing maintenance even if it
means replacing some parts that may not immediately need it. An example
is the rear carriage bearing and the power supply unit fan.
Before you get
started, a few folks on Luminous Landscape forum have
mentioned that the carriage and belt can be changed out without tearing
the entire unit apart as is discussed and illustrated in Bryan
Glynn's video.
According to William Chitham:
"One thing I learned this time
round is that you don't need to take off any of the top or back covers
to work on the carriage and associated parts, just the end covers and
the side plate at the left hand end of the carriage rail. You can
disconnect the ink supply with the carriage over the service station,
remove the clips from the trailing cable and out she comes. Bit more of
a fiddle getting it back in but saves a lot of time, there are many
screws in the top cover and ink tube guide rail...."
*Note from Mark:
Actually, tearing the printer down as illustrated in
the video is a good idea if you want to clean and inspect the printer
for parts that are worn, extra dirty, or just need replacing. But
if you are in a hurry, you can always pull the end caps if you know what
you're doing.
All in all, I recommend tearing the printer down and
doing a super clean. That way when done, it's like a new printer.
John Nollendorfs, another LuLa forum member has
some good suggestions in green:
"To make things easier, I would release the print head from the
parking station BEFORE starting to disassemble the printer by going into
"printhead replacement mode" and then turning off the hard switch by the
power cord. This allows you to easily slide the print head back and
forth as needed. This gets rid of the need to do a mechanical release
from the back of the machine later on."
*Note from Mark:
This is a good idea if your belt has not broken and separated.
Once broken, you get an error message and can not get out of it.
There can be no initialization of the printer in order to get back into
the menu to go into printhead replacement mode. If you see the
belt frayed to the point of breaking, it would be a good idea to bring
the printhead carriage out of the parking station as discussed above by
John, then simply unplug the printer.
"Also, I found that it's not
necessary to remove the plexi lid from the top cover of the machine, as
the video instructions indicate. While taking off the cover was not much
of a problem, trying to rehinge 4 plastic hinge pins on a 44" machine
blindly was nearly impossible. I ended up taking the top cover back off
the machine, so I could see how to properly seat the plastic hinge pins
and after adding the dampers in hinge covers, I was able to screw them
back together and then easily put the whole assembly back on the printer
as one unit. Again, it's not necessary to remove this plexi lid--just
remove the whole assembly, following the directions for removing the top
cover."
AND YET ANOTHER: (Thanks to Ted
Dickens, Oxford Michigan)
"MY Z3200 shredded its belt. I used the info on your website to replace
it and have some notes."
"1. While Bryan Glynn's video on changing the belt is excellent and well
worth the time, it also has some mistakes about the LPS installation
kit. Bryan complained that the kit doesn't include all the required
tools. However, he appears to have failed to notice that the beg of
"extras" included long T8 and T10 bits -- just the tools he says aren't
there. Also, Bryan dismisses the "calibration media" as just a
semi-gloss photo paper. It's not. It's an opaque plastic film. It's
better for calibration because the photo paper expands when ink hits it;
plastic does not.
2. LPS has its own belt-changing video:
https://www.youtube.com/watch?v=P1SOr0tKLP4. I think it's worth
watching both, but the LPS approach should be MUCH faster because it
rightly bypasses a good deal of the assembly. Bryan missed a shortcut
that is detailed in the service manual: If you are removing the top
cover, there is no reason to remove the window. However, LPS video goes
further: There is no need to remove the top cover. Skipping the
extraneous steps shortens the disassembly time, the reassembly time --
and cuts the number of pieces that have to be kept organized.
3. The LPS video shows a shortcut for removing the tailing cables:
Removal of a black plastic guide that sits on top of the tailing cables
about in the middle of the printer. However, Bob Wert just popped it
out, making it seem trivial. Took me a while to figure out the trick:
Remove both screws that hold the guide in place, then pull the guide
toward you and then lift it up. It has clips that fit into the metal
panel beneath it; you have to slide it forward before it can be lifted
out.
4. I managed to break the rear carriage bushing while re-installing the
carriage. I remembered that you had found an alternate source on eBay.
Unfortunately, it looks like that is no longer an option. LPS has the
OEM part for $23; a variety of suppliers in China are offering them for
much less. (I ordered a replacement from LPS, but may order a backup
from one of the Chinese suppliers.)"
*Note from Mark:
At the time Bryan made his video, either the two additional bits were
not yet included in the kit from LPS or they were possibly omitted from
the kit inadvertently. I have watched the LPS video, and admittedly, it
is a quicker way to deal with the belt changing by NOT removing the top
cover and pulling the whole printer apart down to the frame.
Somewhat tight quarters, but doable. Also, Bob Wert makes no
mention of the rear carriage bushing which is so very easy to
break. Note in his video, that when he replaces the carriage, he
has his thumb over the bushing, protecting it while sliding the carriage
on. Wert's approach works fine, but is less thorough than Bryan's.
The advantage to taking the machine apart down to the frame is that it
enables a thorough inspection and a really good opportunity to clean the
printer best. BOTH methods are acceptable.
BTW - the calibration media
included in the kit: meh - no big deal, IMHO. Just any Gloss
or Semi-Gloss will do the job fine - no big deal. I'm with Bryan
on this.
If you are in the mood for some
big time nerdy humor, watch the Bob Wert video, but you have to be on
your toes - he has a wry sense of humor, warped as it is....
TO BEGIN REPLACING THE CARRIAGE BELT ON
Z2100-Z3200ps PRINTERS
According to Bryan Glynn, on his website page detailing the
process:
Supplies needed:
New belt
Non-evaporating synthetic machine oil
Cotton pads
Double-sided tape
Paper towel
Alcohol
Flat blade screwdriver
T8, T10, T15, T20 drivers
Canned air
2′ of paper
Expect to spend 2-3 hours on the job, taking your time. One tip
I forgot to show – while you have the carriage assembly out and
are cleaning it, be sure to wipe clean the color sensor shutter
mirror. It’s on the tiny trap door on the color sensor itself.
It is often hazy and obscured over time which can fail the unit.
Do not clean the sensor lens or emmiter underneath, it should
not need it at all.
DO NOT assume there are missing steps! If it’s not mentioned
DON’T DO IT! That especially means do not try and relock the
release screw for the carriage.
(Thanks to Bryan for permission to
publish his copyrighted information above)
*NOTE: I have found that no matter how
well prepared, this is not a 2-3 hr. job. FWIW/YMMV
This is a journal about my
printers. These are my own personal notes about repairs and maintenance
I have done to my printers. I have made this web site mainly for
my own benefit so that I have a record of what I have done. It is
free for anyone to view. If you use this information do so at your own
risk - I assume no responsibility for errors. If you find any
links that are not working just copy and paste them into your browser.
Some may be obsolete.
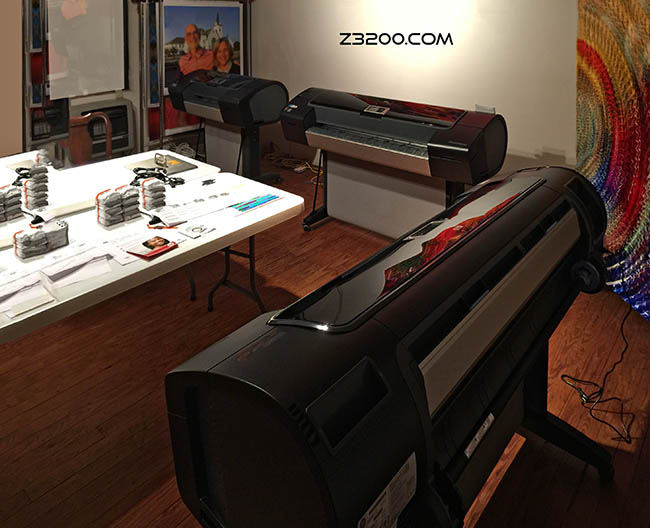
Above: The Lindquist print studio with 3 HP Z Series printers, 3200 and
3200ps.
A fourth Z Series printer is in another room. The third Z3200ps is
being
set up in the photo - notice the ink and printheads on table.