|
REAR CARRIAGE BUSHING ON HP Z3100 and Z3200 Printers
Notes on Tools, Materials, and Procedures by Mark Lindquist
Rear Carriage Bushing Replacement
HP DesignJet Z3100 - Z3200
Mark Lindquist 12/10/2014 - updated --1-10-2017
Rear Carriage Bushing on
the HP DesignJet Z3100 - Z3200 PRINTER
By Mark Lindquist |
August-December 2014-1/5/2017
© 2017 Lindquist Studios All
Rights Reserved
HP Z3200 Rear Carriage Bushing
HP Z Series (Z3200) REAR CARRIAGE BUSHING REPLACEMENT
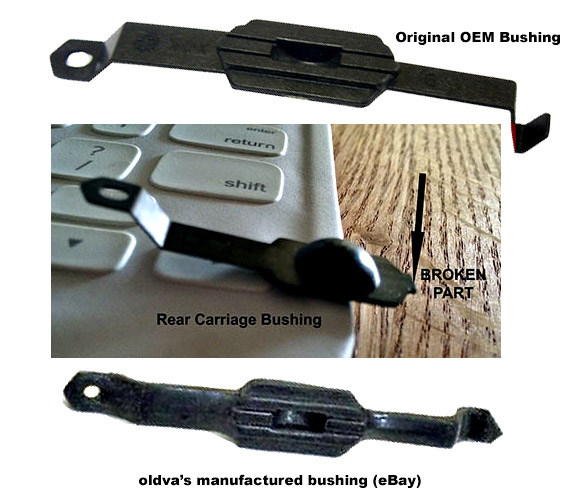
The rear carriage bushing (top in photo above), which is the flimsiest
of parts in the printer, is easily broken.
Thankfully, Bob Wert
of LPS, one of the most brilliant
repair guys on the face of the earth, has come up with a super quick and
easy fix for replacing the Rear Carriage Bushing. Bob is a
brilliant technician. See the video below. Thank you Bob!
I'm leaving everything below because
it's how repairing this part was done in the past, but really, skip all
of it and just do it the way Bob Wert shows in the video. While
you're at it - just buy the bushing from LPS.
(Notes in green from John Nollendorfs:)
"Nowhere is it well documented exactly where this bushing is located and
how it can be easily damaged. Before sliding the carriage off the end of
the rail, the bushing is located on top of the carriage, and needs to be
carefully depressed when sliding the carriage back in it's guide slot.
If you can be very careful sliding the carriage off the end of the
machine, you will notice the bushing, as you start to pull the carriage
off the rails. Start sliding the carriage very slowly, and observe the
bushing on top, as it slides out from under the rail."
Thanks for that tip John. These bushings are getting hard to find and
they are easy to break. They are also becoming pricey. Here is an
example:
Pricey Bushing
Rear Carriage Bushing replacement for HP Q5669-60687 on Z2100, Z3100,
Z3200
A replacement is available for about 15 bucks here
An enterprising guy on eBay with the user name of "oldva"actually
decided to manufacture a replacement that is beefier and much more
reliable (bottom in photo above). "...tough, abrasion and impact
resistant urethane and contains continuous strand carbon fiber tow
running the full length of the bushing."
I ordered the
bushing replacement from him and installed it and it works
perfectly. Sometimes he runs out on eBay.
From his listing:
“...Last year the 'rear carriage bushing' in my
Z2100 printer broke which allowed the print heads to scrape across the
media it was printing on. I was lucky in that the broken part fell on
the floor under the printer, so identification of the problem was easy
and I didn't have to go 'digging' into the printer to recover any broken
pieces that might jam things up. This 'bushing' is one of the components
that set the height of the print heads over the media. Without this
'bushing' in place the print heads may contact the media, especially if
printing on a thick media, such as canvas or board and leave drag marks
in the print path.
I searched and searched for a replacement part, but at the time none
were available, not even from HP ! It appears that this bushing is a
common failure point, as I have found numerous inquires on the internet
regarding it. So, "Desperation being the Mother of Invention" , I headed
down to our workshop, where we do have some equipment for molding
plastic parts. After noting the failure point of the old bushing, I
designed a mold for a new style bushing which would correct the
weaknesses of the bushing design. I have been running the re-designed
bushing for a year in my printer without any more problems.
This listing is for 2 of the re-designed bushings, so you will have a
spare. It is made from a tough, abrasion and impact resistant urethane
and contains continuous strand carbon fiber tow running the full length
of the bushing. The tabs on either end of the bushing are much thicker
than stock, but the center area maintains the 2mm thickness of the stock
bushing, so print head height remains correct.
Included are photo illustrated instructions of an easy method (I've had
a lot of practice) of installing the bushing in a Z2100 printer, that
does not require the degree of dis-assembly suggested in the Service
Manual. It is still necessary to remove the cover over the right side of
the printer which requires a Torx 15 screwdriver, and in addition you
will need a small flat blade screwdriver and needle nose pliers or large
tweezers and a good light source.
The $15 price includes 2 rear carriage bushings, illustrated
installation instructions and free postage in the USA."
On Luminous-Landscape forum, a member, "Roscolo" discusses a replacement
procedure shortcut:
"First, you do this at your own risk. If you need
to install a new Rear Carriage Bushing, I think the odds of you screwing
something up are infinitely greater if you follow the instructions in
the z3100 Service Manual (take the whole printer apart) than doing what
I outline below (only remove the Right Cover), but, bottom line, they
tell you to do it their way. I think my way is better, but don't blame
me if you screw it up.
If you replace your belt on the HP z3100 / HP z3200 it is EASY to break
or lose the Rear Carriage Bushing. It is also VERY EASY to miss this
problem until AFTER you have replaced your belt and reassembled your
printer and find that it is dragging the heads or the carriage on your
paper/canvas, streaking/smearing ink, and making some loud banging
noises when the Carriage travels to the right. So when you replace your
belt, double and triple check that your Rear Carriage Bushing is on AND
that it isn't cracked (it is extraordinarily flimsy plastic) and you
won't have to do what I did.
BUT if you need to replace or install the Rear Carriage Bushing on the
z3100 / z3200, the manual tells you to essentially disassemble the
ENTIRE printer just like you have to do to replace the belt. YOU DO NOT
HAVE TO DO THIS (if you're careful.) Just remove the Right Cover. When
you pull the Carriage all the way to the right, (use a bright light
shining in there so you can see), you will see the hole where the far
end of the Bushing goes and the hole where the near part of the Bushing
goes (look at the diagram in the Service Manual). I just used a pair of
needle nose pliers to hold the bushing so I didn't lose it, (don't let
go!) and using a tiny 4 inch screwdriver (tiny like you could remove the
back of a watch with it), was able to gently force the far end of the
bushing into the far hole. Then CONTINUING TO HOLD ON TO THE BUSHING
WITH YOUR PLIERS, push or pull back that fleshy colored piece of rubber
thingy in the way, and you can easily apply tension to install the near
end of the bushing into the corresponding hole. If you bend the fleshy
rubber thingy a bit, use your pliers to bend it back like it was. This
saved me about 8 hours of headache NOT having to tear down and rebuild
the entire printer AGAIN, and eliminated the likelihood that I could
just as easily lose/break the bushing again when having to put the
Carriage back on!
I did this on the HP z3100. I have not done it on the z3200, but my
understanding is the printers are exactly the same in construction."
The rear carriage bushing also carries oil to lubricate the
carriage guide rod.
See diagram below:

The above illustration is for educational use and may be
subject to copyright
|
(These are my own
personal notes from repairs I have made.
I have made this web page for my own benefit, so I have a record of what
I have done.
If you use this information, do so at your own risk - I
assume no responsibility for errors.) |
|